Powered By Blogger
Showing posts with label dairy free or egg free. Show all posts

Thursday, June 23, 2011

Easy Betty Strikes Again: Corn with Bacon and Mushrooms

It's summer time and the livin' is easy.....well, it should be because I'm really really lazy right now. That said, all the recipes that are being posted right now for easy sides and dinner ideas are catching my attention as much as the articles on how to wrangle 3 kids.


This particular recipe was a no-brainer for us because the ingredients are staple items in this house ("fat and fungus" is it's own food group around here).  Throw in the corn and suddenly I believe it's healthy.


I actually made this as part of Mr. Devlin's Father's Day meal. The Dev's is a notorious meat and potato man, eating veggies only to show he can be a good role model when little eyes are upon him. But it's not like I was going to put him to the brussel sprout test on his special day (that's what Monday's are for).


Naturally, after scanning the recipe, I pretty much did what I wanted with it. Having some bacon already cooked off for a batch of bacon cheddar scones, I could easily skip that step of cooking it in a skillet but that also meant I wouldn't have the necessary fat required to saute the mushrooms in. Also not a real problem for me because I save my bacon fat.  I told you-fat and fungus are taken seriously in this house.


Ok, so basically, all you need is:

bacon--cooked or not is up to you but you'll want about 6 pieces for 4+ servings, chopped
chopped onion, shallots or chives-- I have chives so that's what I used (about 1 heaping tablespoon) but if you are using onion or shallots-about 1/4 cups, chopped fine
mushrooms--button, bella, porcini, oyster, shiitake--entirely up to you but you'll want about 3 cups, sliced or chopped
corn kernels--1 1/2 cups-2 cups frozen or maybe you want to shave off some from some leftover ears if you have some laying around
salt and pepper--totally to your taste


Saute the bacon, adding fat if you need it. If you don't have enough to saute mushrooms in, add a pat or two of butter. Now toss in the mushrooms and onions, stirring now and then as they soften and absorb all the bacony goodness. Adjust your heat as well-medium is a good place to be. When the mushrooms have a bit of browning and softening going on and the onions are somewhat softened, toss in the corn and season to your taste. This is really all there is to the recipe.


I served this as a side to steak and potatoes but I'd easily whip up a bit of this to put over scrambled eggs or hash browns in the morning as well.

Monday, June 20, 2011

Who's The Dip? How to Make Hummus

As the heat rises, my laziness extends in all directions. That's not to mean I don't have weird moments of nesting, like the other night when-instead of tucking my eldest into bed-I cleaned her room top to bottom (even dusting!). But I'm not so very interested in cooking every meal right now. We've been doing a lot of this actually. Which led me to whip up a large batch of hummus to dip and spread on everything (even in the middle of night apparently).


According to Wikipedia--

Hummus is high in iron and vitamin C and also has significant amounts of folate and vitamin B6.[16] The chickpeas make it a good source of protein anddietary fiber; the tahini consists mostly of sesame seeds, which are an excellent source of the amino acid methionine, complementing the proteins in the chickpeas. Depending on the recipe, hummus carries varying amounts of monounsaturated fat.[17] Hummus is useful in vegetarian and vegan diets; like other combinations of grains and pulses, it serves as a complete protein when eaten with bread.


I--per usual--used dried chick peas for my hummus, soaking them overnight and boiling them until they were soft before continuing. You can, however, use a couple of cans of chick peas if you so desire, making sure to drain and rinse them.

This recipe makes a fair amount of spread so it's great for parties too. I've been spreading it on wraps and crackers for Thing 1 and Thing 2. Thing 2 in particular is pretty fond of the stuff, licking it off chips and crackers, then handing them back to me for "re-fills."


Ok, so back to the hummus. If you are using dried, figure half a bag. If you are using canned, 2 15 oz cans should do the job. Here's what else you'll need...


Stir up your tahini
before using it. It will
be thick, like
peanut butter.
2 lemons or 1/2 cup of lemon juice
2-5 cloves of garlic, based on your preference. I used diced garlic and I like a lot so I had about 2 heaping teaspoons
2 tsp olive oil
1/2 tsp salt (and pepper if you like)
1/2 (approximate) cup of water (this is more a give or take based on how thick your hummus is)
1/2 cup tahini (look in your Ethnic food aisle at the grocery store--it's ground roasted sesame seed ground up like peanut butter and it's WONDERFUL).


why, yes-those are finger marks
from me "testing" the hummus


Pull out the food processor and dump in the peas, tahini, garlic, lemon juice, half the oil, salt and pepper and blend it all up smooth. Remove the top of the processor and stir so you know you are getting the top and bottom blended well. Check the flavor to see if you want more of anything and add in some water before blending again.


You're done. Yep, that's what the lady said.


I pretty much can't get enough of this stuff.


When serving hummus, feel free to drizzle a bit of nice olive oil over the top-this serves two purposes really-flavor and keeping the top from drying out. You can also sprinkle a bit of fresh chopped herbs for a pretty display for parties.


Refrigerate any leftovers. In the meantime, dip or spread your hummus everywhere--pita chips, multigrain crackers, cucumber slices, carrot sticks, salad wraps--go on with your bad self.

Tuesday, June 07, 2011

Summer Food: Basic Baked Beans

Yeah yeah, I know-you could pick up a few cans of this stuff for nothing at the store and save yourself the hassle....but do you really think that hunk of blubber in the can really passes for pork? Wouldn't you rather know what really goes into this summertime classic?--you know, just in case the zombie apocalypse makes getting to the store difficult.

Besides that, I know I have mommy readers who are WIC mommies and now have a stockpile of monthly bean rations in the pantry with no idea what to do with them next. Seriously, how much bean salad and soup can you really eat?


beans-soaked, rinsed,
simmered and drained
They lose some of their
color at this point.
This is a one-bag recipe, using one pound of dried small red beans (yes, that's what they are called).  You can also use pinto beans but I prefer the red beans (not kidneys).


This will give you enough for at least 10 servings-in other words, enough to take to the next family picnic or Sunday school cookout without breaking the bank....and somebody always brings a pot of beans so why can't it be you this time?


Soak your bag of red beans over night in cool water in a large bowl. 8 hours later or in the morning, drain off that water and rinse off the beans in fresh cool water.  Place the beans in a large pot and cover with more cool water and bring to a boil. Lower the heat once the water boils so the beans can simmer until they are soft enough to smoosh (* technical term). Drain off the water at this point.


Now, you can cook your beans in the oven or in a crock pot at this point. I like the crock pot because then I really don't have to think about them and it's nigh on impossible to burn them but if your party is in a couple of hours and you need to get this show on the road, then pick out a large casserole dish with a lid and preheat your oven to 350.


You will need the following staples to make some classic baked beans (*note: all measurements are approximate since it's based on preference)

1 medium onion, chopped fine
1 1/2 cups  brown sugar
1/4 cup molasses
ketchup
yellow mustard (less of this than of the ketchup-just a decent squirt)
salt and pepper
I also like a dash of bbq sauce in mine as well.

You can also add in a package of sausages, chopped hotdogs, mini weenies or crumbled bacon. The last time I made this, I added a package of stadium brats and we had a full meal in one pot.


In the crock pot, put on high for 3-4 hours. In the oven, one or two, stirring either occasionally. Taste the beans to see if the flavors need to be adjusted. For instance, I felt mine needed closer to 2 cups of brown sugar in the end and less mustard.

just beginning to cook


And now you know a classic summer dish and a great way to get your kids to eat beans...go ahead-teach them "the song."

Wednesday, May 11, 2011

Some Like It Hot: Cuban Black Beans

I'm in the advanced stages of pregnancy brain here. I start things and forget them. I buy things and don't want them. I stand in front of the pantry and forget what I'm there for. (I've also screwed up the directions to dr's offices my husband is trying to drive me to and forgotten on several occasions that I am, in fact, pregnant.) Needless to say, things are a little our of hand in my normally organized world.

As such, I'm on a bit of a campaign to use up some of the dry stock in my pantry before I enter another grocery store (I do hereby solemnly swear).

I found this recipe somewhere online (because, yes, I forgot to write it down) and cooked it up tonight for dinner. I think it's a keeper....and by putting it on my blog, I don't have to worry about losing the scrap of paper I jotted it down on.

This recipe uses dried black beans so if you are also using dried beans, you will need to soak your beans over night and rinse them before cooking to soft for this recipe. If you are using canned beans, be sure to rinse them first before adding them to the recipe. I'm going to proceed using the dried bean method.

This recipe yielded enough for 4-5 main portions, so if you have a larger crew, it doubles easily.

Prep 1/2 pound of dried black beans according to directions. (I did this ahead of time in the morning which shortened the time I needed to make the actual meal).

In a large skillet:

3-4 Tbs olive oil
1/2 medium onion, chopped fine
3 cloves of garlic, chopped fine (or a heaping Tbs of minced from a jar)
3 ancho chilies in sauce, finely chopped (if you like spicy, add another but this has some good heat)

Saute these ingredients over medium heat until the onions are soft.  If you want a main dish, this is a good time to add in a pound of sliced sausage of your choice. If you want vegetarian or a side dish from this, skip that step and move on.

Add 1 cup of water and stir in:
1 bullion cube of your choice-chicken, ham or veggie
Salt and pepper to taste
1/2 tsp ground cumin
1/2 tsp dried oregano
1 bay leaf
A pinch of sugar
All the cooked beans.

Stir everything together and simmer over a medium low heat; if it seems the moisture is cooking off too fast, add more water. Cover and simmer for 30 minutes. Using a fork or potato masher, mash some of the beans to create a thicker consistency.

Stir in:
2 tsp of vinegar (any kind seems fine)
1 Tbs dry white wine

Cover and simmer for another 15 minutes.

Remember to remove the bay leaf before serving over rice.

I served this with a big bowl of fruit salad and Thing 1 and Thing 2 took turns eating the beans and then the fruit to cool their baby tongues from the spicy, which was just funny to watch. The important thing is, though, that they ate it.

Thursday, April 14, 2011

A Little Something For My Beloved....

When I used to work in a certain university bakery, I would occasionally bring home a little some thing for Mr. Devlin, who was studying hard at the same said university (man, was that a dream job!)


It might have been an eclair that wasn't quite the right length for retail but still perfectly edible or a slice of cake.

The point was, I wanted him to know I was thinking of him.

And now that I'm "just" at home and "just" taking care of the house, I still try to find ways to let him know that I appreciate that he is working hard, and  even though we haven't been on a real date since December, I still think he's pretty cute.

The easiest little goodie for Mr. Man is chocolate covered strawberries and this is the right time of year to make them, with strawberries plentiful and cheap.

air drying the fruit
Look for fruit that is uniform in shape, red and ripe all the way up to the stem and without blemish. If you have a soft, leaking spot on the fruit, the chocolate won't be able to set up there. Also, you never want to introduce a liquid into straight chocolate as it has the potential to make the chocolate seize (that's when the chocolate gets all clumpy and gross-there is a way to fix it* of course but it's still not desirable).

When you are ready to dip, first wipe down the fruit with a damp paper towel, just as you would wash a mushroom. If you submerge them in water, you again run the risk of introducing water into your chocolate and being an unhappy camper.

Let the fruit air-dry-this also allows the fruit to come up a little bit in temperature which I prefer when dipping fruit.

In the mean time, let's melt some chocolate.

Honestly, a bag of semi-sweet chocolate chips works fine. If you like a darker chocolate, like a 70%, try melting down a few candy bars. Or maybe your special person likes white chocolate best. The process is the same. Chop the chocolate (if not using chips) into smaller bits and place in a heat-proof bowl (I prefer  glass myself). Make sure the bowl fit well over a small saucepan that contains a couple of inches of water. The bowl should never ever ever touch that water (that could case the chocolate to scorch--you know, burn? You can't fix that).   Instead, the bowl should rest over the water. This set up is a double-boiler or water bath.

Turn your heat to a medium heat, not high. Chocolate is not to be man-handled, ok? Love it gently and it will do what you want every time. You aren't trying to bring the water to a hard boil, just enough of a simmer to cause the steam to heat the chocolate from underneath. If you have a bunch of steam escaping around the sides of the bowl, lower your heat (a lot). Again, steam being water, you could cause the chocolate to seize.  Keep stirring the chocolate and you will get a nice, shiney melty pot of yum soon.
As soon as the chocolate is about uniformly melted, cut the heat. Remove the bowl from the heat altogether as soon as you have stirred it smooth. Let the chocolate cool some before dipping.


Now you can factory-line assemble some strawberries. Fruit, then chocolate, then bake sheet covered with parchment or waxed paper. (If you're a lefty, reverse the order).

down and in
up and over


Holding the stem of fruit, dip it in the chocolate, nearly to the top. Now pull up and over to the side of the bowl, to lightly scrape the excess from the side that will be the bottom. Tip the bottom of the fruit up a bit to cause the chocolate to catch at the tip instead of dribbling every where and place the fruit on the sheet at the farthest point from you.

scrape back side and tip


 As you move along, you never want to move a new piece over an old piece because you could dribble on the older fruit and it won't look pretty; so move from the farthest edge towards yourself.


The chocolate will set up--unless your house is a bit warm, in which case place the sheet in the fridge for a couple of minutes to help out the process.

If you would like a little drizzle of dark on your white or white on your dark, melt the chocolate in the same way as mentioned above and spoon the chocolate into a small piping bag (or paper piping bag which can be made with a bit of parchment that you have made into a funnel shape). If you are intimidated by that idea, put the chocolate in a ziploc bag and snip a bit of the corner off.

Drizzle the chocolate over as desired and continue to let them set up.


Whether you are placing them on a cake as garnish or serving them with champagne once the kids are (finally) asleep, keep the fruit in a cool place until service. Generally, you don't want them sit around for more than a day (as if, right?)

*If your chocolate seizes, stir in a tablespoon of solid shortening to the chocolate and stir smooth. Add a bit more shortening if necessary but the fat will counteract the liquid.

Tuesday, April 12, 2011

Crazy Granola-Making Hippies

The other day, my good friend Erin--writer of the ever-useful blog Myrtles and Muffins and cohort in many silly adventures through adolescence and summer camp- asked me if I had a post on making granola. And I honestly thought I did because I make it quite often at home. But after checking my archive I realized that we were both delusional and I needed to write said post so we could stop imagining things.


So, Erin, this post's for you....


If you grew up in my house, I don't have to explain that anything that has to do with hippies is total taboo. My father bravely served our country as a Green Beret in Vietnam and did not survive so he could raise some sandal-wearing, pot smoking, granola eating, Beatle-loving ingrates. I really really  took all of this to heart as a kid....well, I did wear sandals but I honestly didn't know a single Beatles song until I  started dating Mr. Devlin (who was shocked beyond words-and that's really saying something). As his parents were at Rutgers during that same period in history, he was raised in an environment of folk songs and "interesting " stories.

 We come from such different worlds sometimes.


Needless to say, I didn't develop a love for granola until long after married and well into my "let's make what we can" stage of domestic evolution. This was before it seemed like everyone had their own recipe so I thought I was hot stuff.

But, seriously, is there any thing else that can make your house smell so good as a batch of granola toasting? I would totally recommend it to those of you trying to sell your house--work up a batch before a showing and see if it doesn't top the ol' "cookies in the oven" routine.

And so, I give you my granola recipe; it's an ever-evolving thing, depending on what I have in the pantry. Experiment with what you love as far as dried fruit and nuts.


Speaking of nuts (no, not the hippies), I used to just rough chop whatever nuts I had laying around and toss them in with the oatmeal to roast but lately, I have stopped doing that after an incident where I burnt all the almonds in the batch. So now I recommend that you toasted the nuts separately on a sheet pan for 7-10 minutes and give them a rough chop with the knife so they are more pleasant in the mouth. Use about a cup to 2 cups of whole almonds, pecans or walnuts. (I have seen recipes with peanuts that also uses peanut butter but I haven't gotten that far yet-I still love me some traditional stuff).

So, preheat the oven 325 and roast the nuts you are planning to use. Make sure to set a timer and just set them aside when they are done.

In a large bowl, mix together
8 cups of oatmeal, old-fashion rolled oats work well but I have also used steel-cut
1 cup flaked coconut
1/2 cup wheat germ (optional)
1/2 cup sunflower seeds (optional)
the oil will just sit on the top
so please be careful not to
splash yourself

In a small saucepan, add the following:

7/8 cup vegetable oil (I prefer canola or safflower)
1 1/4 cup packed light brown sugar
pinch of salt
1 tsp cinnamon
1/2 tsp fresh ground nutmeg
1/2 cup of either honey or REAL maple syrup (or a combination of the two)

Over medium heat, stir these all together just until the sugar dissolves and there are no lumps. You aren't trying to get it to a specific temperature or take it to a simmer-just trying to make the mixture liquid. The oil will rise to the top all the time and the sugars will sink so just keep stirring. When your mixture is evenly blended, remove from the heat and add 1 tbs vanilla extract.


Pour the contents of the saucepan over the oatmeal mixture in the bowl and stir with a large, heat-proof spatula until everything is coated, being sure to get all the dry stuff coated.


Because this makes a lot of granola, it is easier to use two large cookies sheets that have been covered with either silpats or parchment (only use aluminum foil if you have the heavy duty stuff-you'll be stirring the granola up a bit and the thinner stuff will tear). Level out the granola over the two sheets evenly and place in the oven. Set a timer for 10 minutes and let bake.


When the timer is done, stir up the granola, rotating the sheets top to bottom and turning the pans. Continue baking for 5 minutes before repeating the steps. You will continue this step for a total of 20-30 minutes (depending on your oven and the ability to hear your timer). The goal is to have evenly-toasted, golden brown granola.


When you have achieved that, remove the pans from the oven and let them rest on a cooling rack, stirring now and the to remove steam until the pans are completely cooled. Now you can pour it all back into the big bowl you started with (that obviously, you've washed and dried).
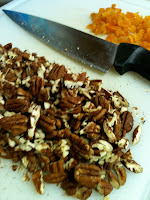
apricots, raisins and
cranberries with
chopped pecans


At this time, you can stir in the nuts and 2 cups of whatever dried fruit you like--raisins, cranberries, chopped apricots, chopped prunes, mango pieces, chopped pineapple, blueberries, strawberries, cherries. There is so much to chose from so go crazy. The only dried fruit I wouldn't add is banana chips because they just get kind of soggy later.


Put your granola in an air-tight container. I use a couple of ziploc bags myself and generally, I try to use up the granola within the month. Keep in a cool, dry place for storage.

Sunday, April 03, 2011

Bacon Cheddar Buttermilk Scones: A Man's Scone*

(*giggle-as soon as this woman makes them for him).

The Dev's has this unsettling habit of not giving me any feedback on something until I try something else and that's when tells me how he felt about the first thing. I guess he saves all his timing for his clients--or that's what I tell myself because as an insecure person I find it terribly annoying.


So when I woke him one morning last week with a fresh cup of hot coffee and a steaming scone to try for this post, I certainly wasn't thinking about the last time I had made a batch of buttermilk scones (as I usually make fresh cream scones-all buttery and decadent). In fact, I probably couldn't tell you how long ago I had made that batch, but I'm willing to bet it was before me lived here. He remembered and all his praise went to that batch. Party pooper.


The scones he was thinking of came from a book I've used the heck out of ever since I bought it way way back in 2005. It doesn't seem like it would be all that useful, looking at the cover but--of my goodness!--I have gotten my money out of that baby. If you can get your hands on a copy of Rebecca Rather's The Pastry Queen, you should. When I am still using a book years after purchase, I feel comfortable recommending them to others.


You'll want to preheat that oven of yours to 400 degrees and cover a baking sheet with parchment or a silpat.

Next, you'll need to cook off about a pound of bacon, nice and crispy (oh that every recipe started this way!)...the original recipe says "10 slices of bacon." I just cook off the pound package and eat a couple of pieces for quality control...mine is a hard job.

Ok, while your bacon cools and drains, prepare the rest of the recipe accordingly:

In a mixing bowl, blend together

3 cups of AP flour
1 Tbs baking powder
1 tsp salt
2 tsp fresh ground black pepper (if you prefer, use a coarser grind or add more pepper)
4 green onions, chopped or 2 tsp dried chives (or you can add diced jalapenos instead)


To this, add

1 stick (1/2 cup) cold butter, diced

Blend in the butter until you have pea-sized chunks before adding in


1 1/2 cups shredded sharp cheddar
the bacon, rough chopped


Blend together until all are covered in flour evenly before adding

3/4 to 1 1/4 cups of buttermilk--add the first amount and pour in any extra depending on how dry the dough may seem....just try not to add too much.


Scrape the bowl out on your bake sheet and shape either into a large round, divided into 8-10 scones OR  shape into a rectangle, divide in half, then half again, then into triangles.


Bake for approximately 20-25 minutes--golden and done on the inside. Let cool ( at least a little) before cutting and serving. I don't think I have to sell you on the fact that these are fantastic hot, with a mug of joe the way you like it (not a girly cup of coffee with foam or syrups, trust me--you need a plain ol' decent cup of joe).

 I apologize I don't have a picture of the finished product--can I just say that they were, um, well-received?

*A note to some of you who want to try scones but are afraid you might be overrun by this new form of breakfast/tea time delight (you know who you are), scones freeze beautifully-either raw or already baked and can be retrieved at your leisure to be baked or warmed through.

Friday, April 01, 2011

Pecan Buttermilk Scones

I'm in the process of letting all of my subscriptions for food magazines expire. This is due in part as a nod to our economic situation; but, the truth is, I'm utterly unimpressed with them-- in the same way that I'm unimpressed with reality tv, shopping at the mall and designer handbags.

Since the advent of the Food Network, foodies every where have been given a voice and a stage and gained the appreciation of the general population. And that's great....hey, I'm basically a food blogger-an unknown breed even 5 years ago. But, much like I loathe bandwagoning in every other realm, I am utterly fed up with the cliques and snobbery that comes with foodies who publish physical magazines. Do I really need to pay someone actual money to tell me that bacon is the hot new thing? Really? Honey, look at my butt-I knew bacon before you could spell it.

Full page spreads of some 20-something's dinner party where they gush over the beauty of organic produce as locavores that they've now paired with a vintage french wine that cost more than my electric bill. To me, these people have become the Ambercrombie and Fitch of the food world and the unpopular chubby girl that's still inside me realizes I don't need this kind of superfluity.

 I've manned the grill. I've run the 6 tiered carousel gas oven, stacked with dozen of scratch made cheesecakes. I've stood in one place for 12 hours, icing cake after cake with consistency only to come back the next day and do it again. I've worked side by side with crusty, mean professionals that push their bodies until bones separate and muscles fail.  I've pulled the late shift, the breakfast shift, the all-nighter, the lunch rush, holidays, record heat and cold. Little Miss 20-Something doesn't know shit about what goes into creating with food, let alone trying to pay your bills with those skills.


Screw you,  popular girl, who just discovered dark chocolate and cupcakes. You sound like Paris Hilton discussing the needs of the Japanese people.


So, imagine my total  surprise when I opened the April issue of bon appetit (because I was stuck on bed rest, with no where to go) and found recipes I would actually like to use.  I theorized that some of this is due to the distinct lack of baking that has been going on in this home due to my new condition. Regardless. I guess even the popular girl can pull a decent quote for the school year book now and then.

Oh, and I totally didn't make the original recipe--you can get that here.

Preheat the oven to 425 and cover a baking sheet with either a silpat or parchment paper.

In a mixer bowl or large bowl, blend together these ingredients:

3 cups AP flour
2/3 cup sugar
1 Tbs baking powder
1/2 tsp baking soda
pinch of salt
1/2 tsp ginger
1 tsp cinnamon
1/4 tsp clove
1/2 tsp nutmeg


To this, toss in
12 Tbs or 1 1/2 stick of cold butter, diced


Blend either with a mixer or your hands until the chunks of butter are about the size of peas. Now add
1 1/2 cups chopped pecans
1/2 cup diced dried apricot (or the dried fruit of your desire)


Blend again just until these items are covered with flour and fully incorporated. You aren't trying to make the butter disappear.


To this dry blend, you will add about a cup of buttermilk and a tsp of vanilla. I say "about" because you may need a little more to bring all the dry together. I ended up needing a cup and a half myself.


The idea here is to bring the dough together just like you would with biscuits (which is what a scone essentially is)....you don't want to overwork or over mix the dough. Just bring it together enough to shape and bake it. And the sooner the better as there is currently a reaction occurring between your buttermilk and your baking soda/baking powder. (baking is science, kids).


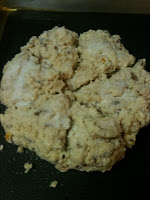
Divide the dough into two balls and shape them into disks, about 2-3 inches thick. With a large knife or bench scraper, cut the rounds into 6 each or 8's if you want a smaller portion (you'll just come back and eat another anyways).


Sprinkle with a little sugar before popping into the oven and baking for approximately 20 minutes. If it seems that the scones are getting very brown but the center seems pretty wet (around 15 minutes), cut the heat to 400.


At the center of each round, you'll be able to see if the dough is still wet-looking or dry. You can poke the center with a toothpick or sharp knife also to test for doneness. Pull out and allow to cool before cutting (yeah I never make it quite that far). A warm scone is the best comfort on a gray day. When the scones are completely cooled, you can store them in an airtight container, warming them for a 20-30 seconds apiece in the microwave if desired.

Tuesday, January 25, 2011

Last Soup Recipe of the Winter: Beef and Barley Soup

My month of soup and muffin recipes is coming to a close. I think the worst part of the winter is over. My proof of this is when I went out the door this morning to get Thing 1 to school, I could smell skunk so it's really only a matter of time. We are supposed to get a huge snow storm this week but I think it's the last hurrah, if you know what I mean.

And so, the need for a big pot of soup won't be so great as we progress into warmer weather.

So let me give you an easy beef and barley soup recipe. This is another good one for the crock pot as barley needs to absorb lots of moisture to soften properly. That doesn't mean you can't make it on the stove top but be prepared to let it simmer for a few hours to get an edible texture.

For my soup, I am using a pearled barley. It's about $.85 for a pound bag, which would easily make two big pots of soup.

mirepoix
Remember when we talked about mirepoix? This is another soup that gathers its flavors from the blend of carrots, onions and celery.

You will need:

1 heaping cup of pearled barley (this is about half a pound bag)
3-4 carrots, diced
1 small onion or 1/2 medium onion, diced
2-3 stalks of celery, diced
1 can diced tomatoes, optional (if you don't use the tomatoes, the soup needs a dash of acid, like a bit of lemon juice or vinegar to balance the flavor)
6-8 cups water with 6 bullion cubes (beef or vegetable) OR 6-8 cups of beef or vegetable stock
1 pound of stew meat or beef tips
salt and pepper to taste; parsley

I like to sear my beef in a skillet first to give it a nice caramelization on the outside instead of just boiled meat. After searing the beef and removing from the skillet, though, I add about a half-cup of the stock or water to the pan to deglaze any of the little bits of flavor that are stuck to the pan. You really don't want to lose them.

To the crock pot, add the broth/water, followed by the veggies, the meat and the barley. Cover and let cook on low for 4+ hours or on high for 2+ hours. Stir occasionally and taste once everything is warmed up to see if you need a bit of this or that for the flavor. As I said, if you don't use the tomatoes, add a bit of acid to balance out the flavor. I used a dash of balsamic vinegar this time because I was also using beef stock so it seemed to work well but that's just me.

When the barley softens, it will also add starch to the soup which thickens the soup a bit so if you would like more broth, add a bit of water as you go.


The soup is done when the vegetables are pleasantly soft and the barley is soft and kind of creamy.

Sunday, January 16, 2011

Orange Chicken

orange soy chicken
with crispy skin
So, obviously, the end of last week took a little detour. I meant to finish up my exploration of using up oranges on Friday.

Nevertheless, we march ever forward!


"Now we take the bird..."
This recipe is good for either a whole chicken or for parts--as in a bag of wings or a bag of legs et al. I chose to use a whole chicken but I cut it down the center (using my best Julia Child voice, I assure you) and laid it flat in a large pyrex casserole dish.


Regardless of what you choose to use, you will need to marinate the meat for a few hours with one part and mix a second part for brushing on the meat as it cooks.


Now, if you are using a bunch of pieces, you can simply marinate them in a ziploc bag for a few hours before roasting.  Stuffing a whole chicken into a bag isn't as easy. I placed mine in the dish I planned to bake it in, covered it with the marinade and chilled it for a couple of hours before cooking.


In a bowl, whisk together
the juice of two oranges (keep the rind)
1/2 cup soy sauce
1 tsp fresh diced garlic
pepper
1/4 cup brown sugar

Pour this over the raw meat. If you are making more than 4 pounds of chicken, double or triple this amount, of course.

Cover and chill.


I'll explain what I did from here with a whole chicken, which took approximately 1 hour and 45 minutes to cook at 350. If you are doing pieces, it will take less time so adjust how long you cook the meat, covered and then uncovered accordingly.


Before cooking the chicken, mix up a second batch of the marinade. Take the rinds from the oranges you have juiced and either stuff them into the bird's cavity with 1/2 an onion, roughly chopped or-if your bird  is in half like mine was, place them under the bird. Brush the chicken with the marinade it has been soaking in and cover with foil.


Cook the whole chicken, covered for 45 before removing the foil and brushing with some of the second batch of marinade. Repeat this step every 10-15 minutes for the next hour. Because you are opening up the oven so often, you are losing heat which is why it takes so long to cook the chicken properly but you are also getting a nice, dark crispy skin on your chicken.


Ah, yes, crispy skin. Look, I don't recommend anyone eats unhealthily all the time but, good grief, if you can't indulge a little here and there, what's the fun? I'm not your doctor.

Be sure to use a meat thermometer to test the doneness of the meat before removing. Chicken should be above 160 degrees (F) to ensure you've killed any bad buggies that could make you ill. And speaking of stuff that can make you sick, be sure to clean your basting brush in boiling water and wipe down any surfaces that raw meat or it's juices may have been exposed to.

Let the meat rest for at least 5 minutes before slicing and serving.

Leftovers from this  are perfect for stir fry or for wraps (a little spinach, some orange slices, some shredded carrot mmmmmm).